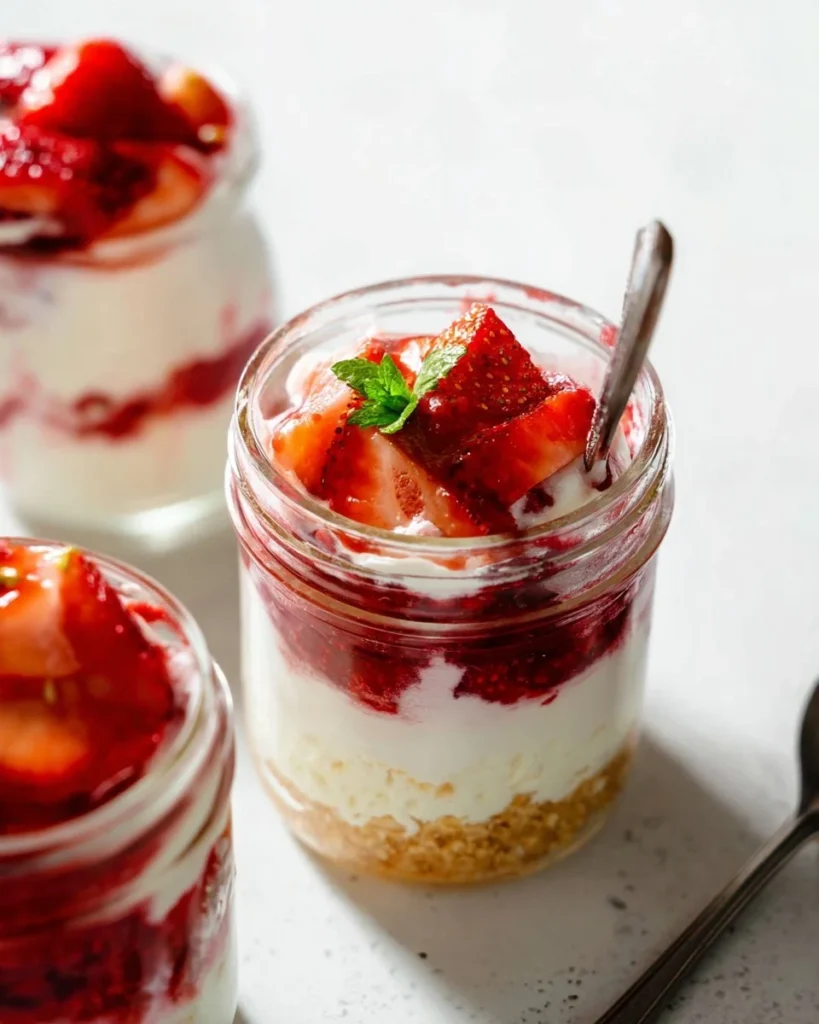
Cheesecake Jars: Easy No-Bake Mini Cheesecakes in Jars
These Cheesecake Jars are a simple, elegant dessert that delivers creamy, tangy filling and a crisp graham cracker crust in a portable package. The texture is silky from full-fat cream cheese and whipped heavy cream, with a pleasant crunch from the graham crumbs and a gentle buttery aroma. They are ideal for potlucks, picnics, or a quick weeknight treat when you want something special without baking. If you like to explore different cheesecake ideas, you might enjoy the twist on caramel flavors in these caramel apple cheesecake bars for another crowd-pleasing option. These jars set quickly in the fridge and can be customized with seasonal fruit, chocolate sauce, or a dollop of extra whipped cream for a pretty finish.
Ingredients
- 2 Tablespoons unsalted butter, melted — helps bind the graham cracker crust and adds richness.
- 1 cup graham cracker crumbs — provides the crunchy base; use finely crushed crumbs for a smooth crust.
- 1 cup heavy cream, cold — whipped to stiff peaks to lighten the filling and give it that airy texture.
- 8 ounces full-fat brick cream cheese, softened — the main flavor and body of the cheesecake. Soften at room temperature for best results.
- 1/3 cup granulated sugar — sweetens the cream cheese base without overpowering the tang.
- 2 Tablespoons sour cream, at room temperature — adds a touch of tang and silkiness to the filling.
- 1 teaspoon lemon juice — brightens the flavor and balances the richness.
- 1/2 teaspoon pure vanilla extract — rounds out the flavor and adds warmth.
- Toppings & garnishes (your choice, such as fruit, chocolate sauce, or whipped cream) — finish each jar to taste and occasion.
For more playful cheesecake ideas, consider looking at a recipe for creamy gingerbread cheesecake for seasonal inspiration.
Step-by-step Instructions
- Prepare your jars: Gather 6 clean 8-ounce jars or 10 clean 6-ounce jars and set them on a tray or work surface. This makes assembly quick and neat.
- Make the crust: Melt the unsalted butter in a heat-proof bowl or on the stove. Add the graham cracker crumbs and stir until the mixture looks like wet sand and holds together when pressed. Spoon about 2 tablespoons of the crust mixture into each 8-ounce jar, or 1 and 1/2 tablespoons into each 6-ounce jar. Press lightly with the back of a spoon to level. Tip: wetting the back of the spoon slightly helps create a smoother crust.
- Whip the cream: In a large bowl, use a hand mixer or stand mixer with a whisk attachment to whip the cold heavy cream until stiff peaks form, about 3 to 4 minutes. Keep an eye on it so it does not overwhip.
- Beat the cream cheese base: In a separate bowl, beat the softened cream cheese with the granulated sugar, sour cream, lemon juice, and vanilla extract on medium-high speed until smooth and creamy. Scrape the bowl down as needed to remove lumps. For another style of creamy filling, you may enjoy recipes like this espresso cheesecake.
- Fold in the whipped cream: Gently fold the whipped cream into the cream cheese mixture until fully combined. Use a spatula and fold with a light hand to keep the mixture airy.
- Layer the filling: Spoon a generous amount of the filling on top of the crust in each jar. Smooth the top with the back of a spoon or an offset spatula.
- Chill: Refrigerate the jars for at least 30 minutes to let them set. For firmer texture, chill for 2 hours.
- Serve with toppings: Just before serving, add your desired toppings and garnishes. Serve chilled and enjoy.
Recipe Details
- Prep Time: 15 minutes
- Cook Time: 0 minutes
- Chill Time: at least 30 minutes (see note in steps)
- Total Time: about 45 minutes (including minimum chill)
- Servings: 6 to 10 jars, depending on jar size (6 jars if using 8-ounce jars, 10 jars if using 6-ounce jars)
- Calories: approximately 425 kcal per 8-ounce jar serving (approximate; varies with toppings)
For playful presentation ideas and portion inspiration, check out creative recipes such as fruity pebbles cheesecake tacos.
Tips, Storage & Variations
- Tips: Make sure the cream cheese is well softened to avoid lumps. Cold heavy cream whips faster, so keep it chilled until you are ready to beat it. Use a light touch when folding to retain volume.
- Storage: Store assembled jars in the refrigerator, covered, for up to 3 days. Add fresh toppings right before serving for best texture.
- Freezing: For longer storage, freeze the jars without fresh fruit or whipped cream on top. Wrap lids tightly and freeze up to 1 month. Thaw in the refrigerator overnight before serving.
- Flavor variations using existing ingredients only: increase lemon juice slightly for a brighter, tangier bite; add a little extra sour cream for a silkier, tang-rich filling; use leftover whipped cream from the filling as a topping for an extra creamy finish. For other no-bake cheesecake inspiration, you might enjoy the fun of a marshmallow whip cheesecake style dessert.

FAQ
- How long do cheesecake jars need to chill?
- Chill at least 30 minutes, though 2 hours yields a firmer texture.
- Can I use low-fat cream cheese or light heavy cream?
- The recipe calls for full-fat cream cheese and heavy cream for best texture and flavor; substitutions will produce a thinner filling.
- Do I need to bake the crust?
- No. The crust is a no-bake mixture of melted butter and graham cracker crumbs pressed into the jars.
- Can I prepare these ahead of time?
- Yes. Assemble and refrigerate up to 3 days ahead. Add fresh toppings just before serving.
- How do I prevent the filling from being lumpy?
- Beat the cream cheese until smooth before adding other ingredients, and fold the whipped cream gently.
- What toppings work best?
- Fresh fruit, chocolate sauce, or extra whipped cream are all excellent choices.
People Also Ask
Can I make these cheesecake jars for a party?
Yes, they are perfect for parties because they are portioned and easy to serve.Are these jars suitable to travel with?
They travel well if kept chilled, especially in a cooler or insulated bag.Can I double the recipe?
Yes, simply double all ingredient quantities and use more jars.Will the crust get soggy over time?
Crust may soften after several days in the refrigerator, so add crunchy toppings just before serving for contrast.Can I use pre-made whipped cream instead of whipping heavy cream?
You can, but homemade whipped cream folded into the filling gives a better texture.Are these jars child friendly?
Yes, they are easy to eat and can be customized with kid-friendly toppings.What size jar gives the best presentation?
8-ounce jars create a generous single serving, while 6-ounce jars are ideal for smaller portions or samplers.
Conclusion
These Cheesecake Jars are a quick, no-bake way to enjoy classic cheesecake flavors with minimal fuss and maximum charm. They are endlessly customizable, portable, and great for sharing with friends and family. For more jar cheesecake ideas and presentation tips, see this helpful collection of No-Bake Cheesecake Jars and a different method in the Slow Cooker Cheesecake in a Jar guide. Try the recipe, experiment with your favorite toppings, and share your results with loved ones for an easy, cozy dessert moment.
PrintCheesecake Jars: Easy No-Bake Mini Cheesecakes in Jars
Simple, elegant no-bake mini cheesecakes in jars with a creamy filling and a crisp graham cracker crust.
- Prep Time: 15 minutes
- Cook Time: 0 minutes
- Total Time: 45 minutes
- Yield: 6 jars 1x
- Category: Dessert
- Method: No-Bake
- Cuisine: American
- Diet: Vegetarian
Ingredients
- 2 Tablespoons unsalted butter, melted
- 1 cup graham cracker crumbs
- 1 cup heavy cream, cold
- 8 ounces full-fat brick cream cheese, softened
- 1/3 cup granulated sugar
- 2 Tablespoons sour cream, at room temperature
- 1 teaspoon lemon juice
- 1/2 teaspoon pure vanilla extract
- Toppings & garnishes (your choice, such as fruit, chocolate sauce, or whipped cream)
Instructions
- Prepare your jars: Gather 6 clean 8-ounce jars or 10 clean 6-ounce jars and set them on a tray or work surface.
- Make the crust: Melt the unsalted butter in a heat-proof bowl. Add the graham cracker crumbs and stir until the mixture looks like wet sand. Spoon about 2 tablespoons of the crust mixture into each jar.
- Whip the cream: In a large bowl, whip the cold heavy cream until stiff peaks form, about 3 to 4 minutes.
- Beat the cream cheese base: In a separate bowl, beat the softened cream cheese with the granulated sugar, sour cream, lemon juice, and vanilla extract until smooth.
- Fold in the whipped cream: Gently fold the whipped cream into the cream cheese mixture until fully combined.
- Layer the filling: Spoon a generous amount of the filling on top of the crust in each jar.
- Chill: Refrigerate the jars for at least 30 minutes to let them set.
- Serve with toppings: Just before serving, add your desired toppings and garnishes.
Notes
Make sure cream cheese is well softened. Store jars in the refrigerator for up to 3 days.
Nutrition
- Serving Size: 1 jar
- Calories: 425
- Sugar: 22g
- Sodium: 210mg
- Fat: 30g
- Saturated Fat: 18g
- Unsaturated Fat: 10g
- Trans Fat: 0g
- Carbohydrates: 35g
- Fiber: 1g
- Protein: 6g
- Cholesterol: 90mg
Keywords: cheesecake, no-bake dessert, mini desserts, portable dessert