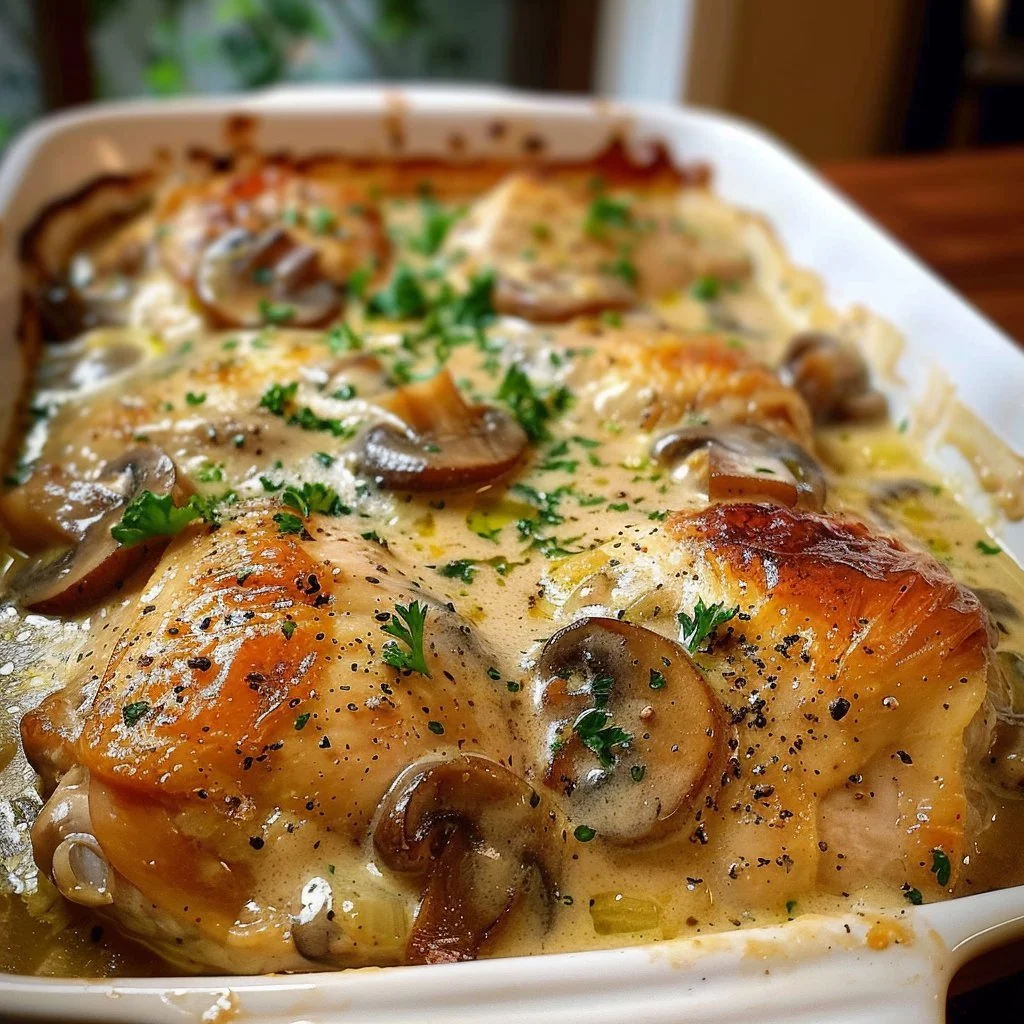
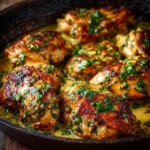
Garlic Butter Chicken
This garlic butter chicken is a simple, comforting dish that fills the kitchen with warm, savory aromas of toasted garlic and melted butter. The exterior is golden and slightly crisp from a light flour dredge, while the interior stays tender and juicy. The sauce is glossy, silky, and brightened with a squeeze of lemon and a sprinkle of fresh parsley. It is ideal for weeknight dinners when you want something quick but impressive, or for a laid back weekend meal served with mashed potatoes, steamed vegetables, or a crusty loaf to soak up the sauce. If you enjoy cozy, garlic-forward meals, this recipe pairs beautifully with buttery sides and fresh greens. For a variation that leans into wraps and melty cheese, try my take on cheesy garlic chicken wraps at cheesy garlic chicken wraps.
Ingredients
- 2 pork tenderloins (about 1 to 1 ½ pounds each), whole pieces for the protein, offering lean, tender meat once cooked.
- ¼ cup all-purpose flour, for dredging and creating a light crust and to help thicken the sauce.
- ½ cup chicken stock (low-sodium preferred), adds savory depth and creates the pan sauce base.
- 6 tablespoons unsalted butter (divided into chunks), use cold butter added later to create a glossy, rich sauce.
- 2 cloves garlic (minced or finely diced), for fresh, pungent garlic flavor in the sauce.
- 1 tablespoon fresh parsley (finely chopped), brightens the finished dish and adds color.
- 1 tablespoon olive oil, helps sear the meat and raises the smoke point slightly when combined with butter.
- 1 teaspoon garlic powder, gives a gentle garlic backbone to the flour coating.
- 1 teaspoon salt, seasons the flour mix and the meat.
- ½ teaspoon black pepper, for a mild spice and aromatic note.
- 1 lemon (divided into 4 wedges for serving), a squeeze over the finished dish lifts the flavors.
For a bolder, buttery pasta pairing, see this cowboy butter chicken pasta idea at cowboy butter chicken pasta.
Step-by-Step Instructions
In a shallow dish, combine the flour, garlic powder, salt, and pepper. Mix well, making sure the spices are evenly distributed in the flour.
Tip: Shake the mixture through a fine mesh sieve or whisk briskly to prevent clumps.Butterfly the chicken breasts into 4 even-sized pieces and dredge in the flour mixture. Shake off excess flour so the coating is light and even.
Tip: If pieces stick, lightly press the flour onto each surface for better adherence.Heat 1 tablespoon of butter and 1 tablespoon of olive oil in a large frying pan over medium-high heat. Cook the chicken for 3-5 minutes on each side until golden and cooked through. Transfer to a plate.
Cooking note: The exact time depends on thickness; a golden crust and an internal temperature around 160 to 165 F indicates doneness for most poultry and pork preparations.Lower heat and add minced garlic, cooking for 1-2 minutes. Add chicken stock and scrape any browned bits from the pan.
Tip: Scraping those browned bits, or fond, is key to building a flavorful sauce.Whisk in remaining butter to create a sauce, stir in parsley, and adjust seasoning. Continue whisking until the butter melts and the sauce is smooth.
Technique tip: Add butter in cold chunks and whisk over low heat so the sauce emulsifies into a glossy finish.Return chicken to the pan, spoon sauce over it, and simmer for a few minutes. Serve with lemon wedges for squeezing over each portion.
Final note: Spoon sauce over the pieces so each serving is well coated and brightened with a lemon wedge.
For a warm handheld option that uses similar flavors, you may like these deliciously cheesy chicken garlic wraps shown here deliciously cheesy chicken garlic wraps.
Recipe Details
- Prep Time: 15 minutes
- Cook Time: 15 minutes
- Total Time: 30 minutes
- Servings: 4 servings
- Calories: approximately 620 kcal per serving
If you want to pair this with a rich pasta, consider a garlic butter beef style bowtie pasta for inspiration at garlic butter beef cheesy bowtie pasta.
Tips, Storage & Variations
Tips
- Pat the meat dry before dredging to help the flour stick and promote a golden crust.
- Use low-sodium chicken stock so you can control final seasoning.
- Add lemon gradually and taste, lemon can brighten the sauce without overpowering it.
Storage
- Refrigerate leftovers in an airtight container for up to 3 days. Reheat gently in a skillet over low heat, adding a splash of stock or water to loosen the sauce.
- Do not store lemon wedges with leftovers, add fresh before serving.
Freezing
- Freeze cooked pieces and sauce separately in airtight freezer-safe containers for up to 2 months. Thaw overnight in the refrigerator before reheating. Reheat slowly to retain sauce texture.
Flavor variations using only the ingredients on hand
- Increase garlic powder slightly for a more pronounced garlic crust.
- Finish with an extra tablespoon of butter in the sauce for a richer mouthfeel.
- Add an extra squeeze of lemon right before serving for a brighter, tangier finish.
For a steak-style, creamy garlic twist you can reference presentation ideas from the garlic butter steak parmesan cream sauce guide at garlic butter steak parmesan cream sauce.

FAQ
Can I use pork tenderloins for this garlic butter chicken recipe?
Yes, the recipe lists 2 pork tenderloins, and they will work well when cooked and sliced or butterflied according to the directions.How do I know when the meat is cooked through?
A golden crust and an internal temperature near 160 to 165 F indicates the meat is cooked and safe to eat.Can I make the sauce ahead of time?
Yes, make the sauce and refrigerate separately for up to 24 hours, then gently reheat and whisk in cold butter before returning the meat.What can I serve with this dish?
Mashed potatoes, steamed vegetables, rice, or crusty bread are all excellent for soaking up the garlic butter sauce.Can I skip the flour dredge?
You can skip it, but the flour helps create a light crust and slightly thickens the pan sauce.How much lemon should I add?
Start with a light squeeze from one wedge, taste, and add more if you prefer more brightness.
People Also Ask
How do I make a silky garlic butter sauce?
Whisk cold butter into warm pan juices slowly over low heat until the butter melts and emulsifies into a smooth sauce.Is butter or olive oil better for searing?
Use a combination of both, as in this recipe, because oil raises the smoke point while butter adds flavor.Can I use low-sodium stock for better control?
Yes, low-sodium stock is recommended so you can adjust salt at the end.How long does garlic need to cook before it turns bitter?
Garlic should be cooked briefly, about 1 to 2 minutes, until fragrant and lightly golden to avoid bitterness.What is the best pan for making this recipe?
A heavy, large frying pan that holds heat evenly works best for a good sear and sauce reduction.Should I rest the meat after cooking?
Resting for a few minutes can help redistribute juices and keep the meat tender.How do I prevent the butter from separating?
Keep the heat low when adding butter and whisk continuously to create an emulsified sauce.Can I double the recipe for a larger group?
Yes, double ingredients and work in batches to avoid overcrowding the pan during searing.
Conclusion
I hope this garlic butter chicken becomes a go-to for busy nights when you want a warm, satisfying meal with minimal fuss. If you enjoyed this version, you might also like the Garlic Butter Chicken (4 Ingredient Sauce!) recipe from the Garlic Butter Chicken (4 Ingredient Sauce!) recipe at Don’t Go Bacon My Heart for another simple take, or try the one-pan Garlic Butter Chicken from one-pan Garlic Butter Chicken from The Girl Who Ate Everything to see a different approach. Please try the recipe, share how it turned out, and enjoy the cozy flavors with friends and family.
PrintGarlic Butter Chicken
A simple and comforting garlic butter chicken dish with a golden and slightly crisp exterior, tender meat, and a glossy sauce enhanced by lemon and parsley.
- Prep Time: 15 minutes
- Cook Time: 15 minutes
- Total Time: 30 minutes
- Yield: 4 servings 1x
- Category: Main Course
- Method: Searing
- Cuisine: American
- Diet: Paleo
Ingredients
- 2 pork tenderloins (about 1 to 1 ½ pounds each)
- ¼ cup all-purpose flour
- ½ cup chicken stock (low-sodium preferred)
- 6 tablespoons unsalted butter (divided into chunks)
- 2 cloves garlic (minced or finely diced)
- 1 tablespoon fresh parsley (finely chopped)
- 1 tablespoon olive oil
- 1 teaspoon garlic powder
- 1 teaspoon salt
- ½ teaspoon black pepper
- 1 lemon (divided into 4 wedges for serving)
Instructions
- Combine the flour, garlic powder, salt, and pepper in a shallow dish. Mix well.
- Butterfly the chicken breasts into 4 even-sized pieces and dredge in the flour mixture. Shake off excess flour.
- Heat 1 tablespoon of butter and 1 tablespoon of olive oil in a large frying pan over medium-high heat. Cook the chicken for 3-5 minutes on each side until golden. Transfer to a plate.
- Lower heat and add minced garlic, cooking for 1-2 minutes. Add chicken stock and scrape the pan.
- Whisk in remaining butter to create a sauce, stir in parsley, and adjust seasoning.
- Return chicken to the pan, spoon sauce over it, and simmer for a few minutes. Serve with lemon wedges.
Notes
Pat the meat dry before dredging for better adherence of the flour. Use low-sodium chicken stock for better control over seasoning.
Nutrition
- Serving Size: 1 serving
- Calories: 620
- Sugar: 1g
- Sodium: 300mg
- Fat: 40g
- Saturated Fat: 24g
- Unsaturated Fat: 15g
- Trans Fat: 0g
- Carbohydrates: 20g
- Fiber: 1g
- Protein: 50g
- Cholesterol: 160mg
Keywords: garlic chicken, butter chicken, easy chicken recipes