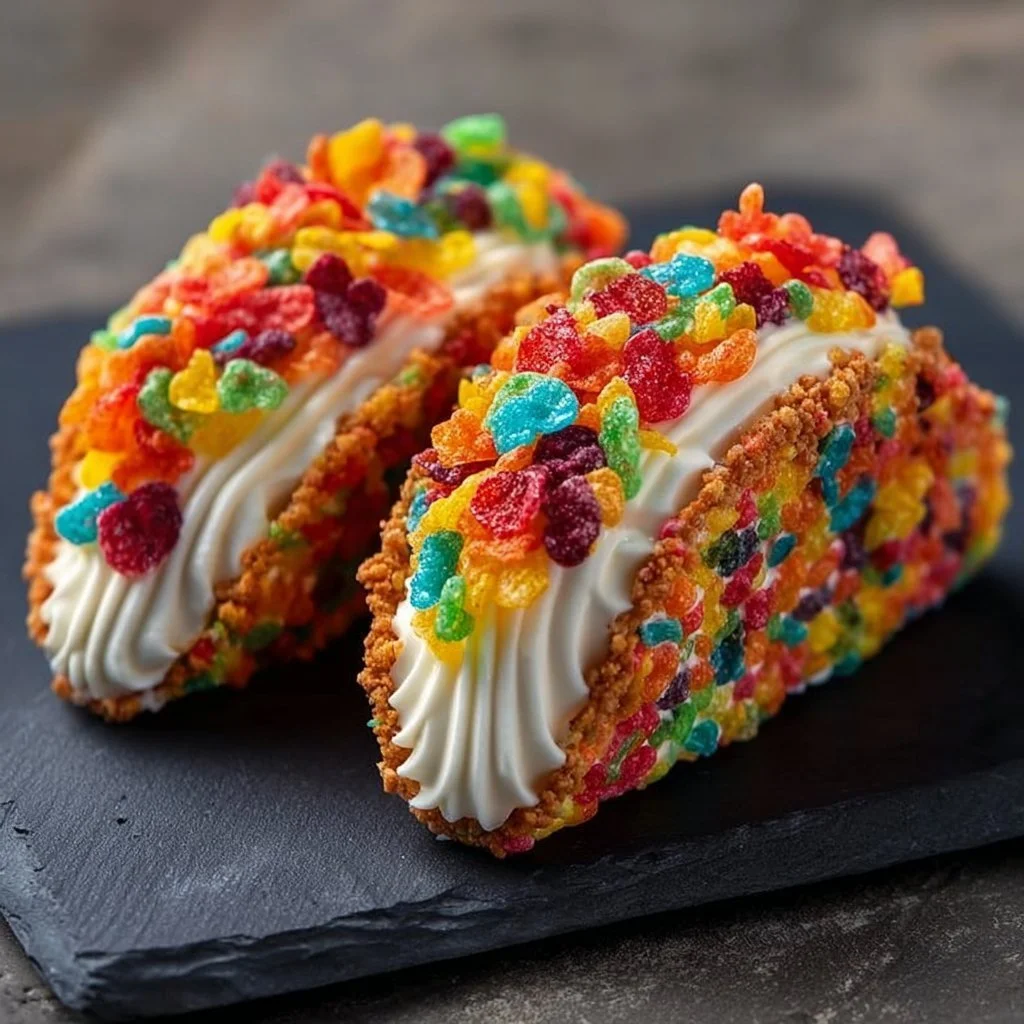
Fruity Pebbles Cheesecake Tacos: A Colorful Twist on Dessert
Imagine a delightful combination of creamy cheesecake layered inside a crunchy taco shell, adorned with vibrant bits of Fruity Pebbles cereal. Fruity Pebbles Cheesecake Tacos bring a playful twist to any dessert table, infusing all the nostalgia of childhood breakfasts with the indulgence of cheesecake. Every bite is a symphony of textures, from the satisfying crunch of the taco shell to the velvety softness of the cheesecake filling. The sweet aroma wafts through the kitchen, inviting all to gather around for a deliciously vibrant treat that not only looks stunning but also tastes incredible. Perfect for family gatherings, weekday desserts, or just because, I invite you to dive into this colorful, fun-filled recipe!
Understanding This Recipe
Fruity Pebbles Cheesecake Tacos marry traditional cheesecake ingredients with a fun presentation that promises to delight both kids and adults alike. Originating from the playful side of dessert innovation, these tacos are a splendid way to take everyone’s favorite flavors and create something entirely new. The tacos feature a straightforward cheesecake filling made from cream cheese, sugar, and whipped cream, which is encased in crispy, hard taco shells. The culmination of sweet creaminess from the cheesecake and the nostalgic crunch from the Fruity Pebbles creates a memorable treat.
These tacos can be assembled quickly, making them a convenient choice for gatherings. Imagine pulling out a platter of these vibrant tacos at a party—your guests will be enchanted by their colorful appeal. You can also make the filling ahead, allowing for a last-minute assembly that saves time without sacrificing flavor. Whether enjoyed at home or shared at a potluck, these fruity tacos are bound to generate smiles and happy chatter!
Why You’ll Love This Recipe
You’ll adore Fruity Pebbles Cheesecake Tacos for several reasons. They are an exciting combination of flavors that sustains childhood nostalgia while delivering a grown-up twist in terms of richness. The vibrant colors not only catch the eye but also charm the palate, making dessert a feast for both eyes and taste buds.
- Ease of Preparation: With minimal baking required, you can whip these up in no time, making them ideal for busy weeknights or unexpected guests.
- Flavor Complexity: The richness of cheesecake paired with the sweetness and crunch of Fruity Pebbles creates a delightful textural contrast that keeps each bite interesting.
- Family-Friendly: Kids will love the colorful appearance and fun eating method, while adults will appreciate the refreshing taste that captures the joy of childhood.
- Budget-Friendly: Utilizing simple ingredients means you can recreate this dish without breaking the bank while allowing for ingredient swaps to suit your pantry.
Let’s Cook Fruity Pebbles Cheesecake Tacos at Home
To prepare these delightful cheesecake tacos, you’ll need just a few tools—mixing bowls, a hand mixer, and taco shells. Overall, this recipe takes about 30 minutes of active time, with additional chilling time needed for the filling. Let’s get started on assembling these sweet treats!
Ingredients
- 8 oz cream cheese: This provides the rich, creamy base for your cheesecake filling. Ensure it’s softened for easy mixing.
- 1/2 cup granulated sugar: Sweetens the cheesecake and complements the cereal’s fruitiness.
- 1 cup whipped topping: Adds airiness and fluffiness to the filling; you can substitute with whipped cream if desired.
- 1 tsp vanilla extract: Enhances the flavor of the cheesecake, making it more aromatic and delicious.
- 12 hard taco shells: Choose the smaller ones so that they are easy to handle and perfect for dessert-sized bites.
- 2 cups Fruity Pebbles cereal: Adds vibrant color and a crunchy texture that makes each taco exciting to eat.
Directions
Prepare the Filling: In a mixing bowl, beat the softened cream cheese with an electric mixer until smooth. This should take about 2-3 minutes—aim for a creamy texture without lumps!
Add Sugar and Vanilla: Gradually add the granulated sugar and vanilla extract to the cream cheese, continuing to mix until well combined. The mixture should become glossy and fluffy, which may take another 2-3 minutes.
Fold in Whipped Topping: Gently fold in the whipped topping until the mixture is well combined and fluffy. This step is crucial as it ensures your filling maintains its light texture—avoid over-mixing!
Chill the Filling: Cover the bowl with plastic wrap and refrigerate for at least 30 minutes. This helps the flavors meld together while making it easier to fill the taco shells.
Assembly: Once the filling is chilled, carefully spoon it into each hard taco shell. You can use a piping bag for a neat presentation or simply spoon it in with a small spatula.
Top with Fruity Pebbles: Generously sprinkle Fruity Pebbles on top of the cheesecake filling, pressing gently to adhere. The colorful caps of cereal will create a stunning finish.
Serve and Enjoy: Serve immediately for the best crunch, or chill in the fridge for another 10 minutes before serving. The tacos can be kept in the fridge for a short time, but they are best enjoyed fresh!
What to Serve With Fruity Pebbles Cheesecake Tacos
Fruity Pebbles Cheesecake Tacos stand beautifully on their own, but they can also be paired with various accompaniments to enhance your dessert spread. Here are a few ideas:
- Fresh Fruit Salad: A refreshing fruit salad with seasonal berries and melon can balance the richness of the cheesecake and add a burst of freshness.
- Whipped Cream: Don’t shy away from adding a dollop of whipped cream on the side—this complements the serving while providing additional creaminess.
- Ice Cream: A scoop of vanilla or strawberry ice cream enhances the experience with its creamy texture and cool temperature, merging beautifully with the fruity flavor.
Top Tips for Perfecting Fruity Pebbles Cheesecake Tacos
Perfecting these tacos is all about the details in preparation and assembly. Here are some tips to keep in mind:
- Ingredient Swaps: For a dairy-free version, use coconut cream in place of cream cheese and vegan whipped topping to achieve similar creaminess and flavor.
- Spice Adjustments: If you want to add a hint of flavor, consider mixing in a little lemon zest or almond extract to the filling for a citrus or nutty twist.
- Equipment Advice: An electric mixer makes blending the cheesecake filling a breeze, but if you’re in a pinch, a sturdy wooden spoon can do the trick.
- Storage Tips: Keep any leftover assembled tacos in an airtight container in the fridge. They are best consumed within a day for optimal crunch.
Variations & Add-Ins
To take your Fruity Pebbles Cheesecake Tacos to the next level, consider these fun variations:
- Chocolate Drizzle: Melt dark or white chocolate and drizzle it over the assembled tacos for a decadent touch.
- Nutty Crunch: Mix in crushed nuts, like almonds or pecans, with the Fruity Pebbles for an added layer of crunch and flavor.
Kid-Friendly Version
Making these tacos appealing to kids can be a fun adventure! Allow them to help with the assembly, letting them choose how much filling and cereal to use. Use smaller shells if desired, or adapt the filling by reducing the sugar to suit their taste. Consider using a flavored yogurt instead of whipped topping for a fun twist that kids might find more appealing!
Storing and Reheating Tips
To extend the life of your Fruity Pebbles Cheesecake Tacos, store any leftovers in an airtight container in the fridge. They’ll last about 1-2 days, but keep in mind that the taco shells may get soggy over time. If you’re working with a large batch, it’s best to prepare the filling and assemble just a few tacos at a time.
FAQs
Can I prepare the filling in advance?
Absolutely! You can make the cheesecake filling a day ahead and store it in the refrigerator. Just make sure to assemble the tacos shortly before serving to maintain the taco shells’ crunch.
What if I can’t find hard taco shells?
If you can’t locate hard taco shells, look for mini waffle cones or even crisp cookie cups as an alternative vessel to hold the cheesecake filling.
Can I modify the recipe for dietary restrictions?
Certainly! Use low-fat cream cheese and whipped topping for a lighter version, or swap to non-dairy alternatives to make it vegan-friendly.
How should I store the leftovers?
Store the assembled tacos in an airtight container in the fridge for up to 2 days. For longer storage, consider keeping the filling and taco shells separate, assembling just before eating.
Conclusion
Fruity Pebbles Cheesecake Tacos offer a delightful blend of flavors and textures that will leave your family and friends reaching for seconds. Not only are they simple to make, but they also provide a colorful and fun dessert option that can brighten any occasion. They prove that joy in the kitchen can come from creativity and a few playful ingredients. Try it tonight and let me know how it turned out!
Fruity Pebbles Cheesecake Tacos

A delightful combination of creamy cheesecake layered inside crunchy taco shells, adorned with colorful Fruity Pebbles cereal for a fun twist on dessert.
- Prep Time: 30 minutes
- Cook Time: 0 minutes
- Total Time: 30 minutes
- Yield: 12 servings 1x
- Category: Dessert
- Method: Chilling
- Cuisine: American
- Diet: Vegetarian
Ingredients
- 8 oz cream cheese, softened
- 1/2 cup granulated sugar
- 1 cup whipped topping
- 1 tsp vanilla extract
- 12 hard taco shells
- 2 cups Fruity Pebbles cereal
Instructions
- In a mixing bowl, beat the softened cream cheese with an electric mixer until smooth, about 2-3 minutes.
- Gradually add sugar and vanilla extract, mixing until glossy and fluffy, another 2-3 minutes.
- Gently fold in whipped topping until well combined.
- Cover and refrigerate the filling for at least 30 minutes.
- Spoon the chilled filling into each taco shell.
- Generously sprinkle Fruity Pebbles on top, pressing gently to adhere.
- Serve immediately, or chill for another 10 minutes before serving.
Notes
These tacos are best enjoyed fresh but can be refrigerated for up to 2 days. Store the filling and shells separately if you have leftovers.
Nutrition
- Serving Size: 1 taco
- Calories: 180
- Sugar: 8g
- Sodium: 150mg
- Fat: 8g
- Saturated Fat: 4g
- Unsaturated Fat: 4g
- Trans Fat: 0g
- Carbohydrates: 24g
- Fiber: 1g
- Protein: 3g
- Cholesterol: 20mg
Keywords: cheesecake, tacos, dessert, Fruity Pebbles, fun dessert, colorful dessert