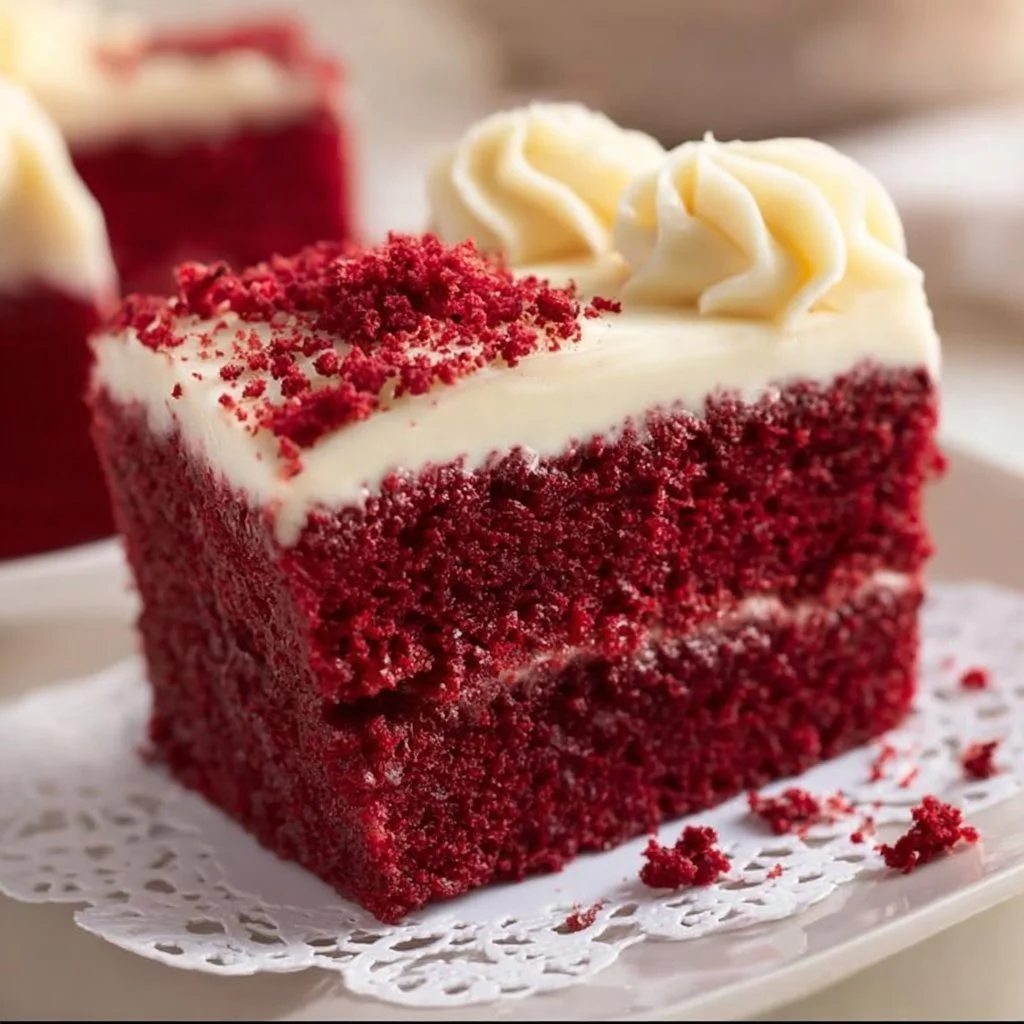
Classic Red Velvet Cake Recipe
Red velvet cake is a timeless dessert that effortlessly combines a soft, velvety texture with a luscious cream cheese frosting. Its striking red hue, a delightful blend of cocoa and vanilla flavors, makes it a showstopper for any celebration. Whether served at a birthday party, anniversary, or simply as a sweet treat for loved ones, this cake is sure to garner compliments. The rich aroma that wafts through your kitchen while it bakes will have everyone eagerly anticipating a slice. This classic red velvet cake is not just a feast for the eyes but also a delicious indulgence that is moist, tender, and utterly irresistible.
Ingredients
- 2 1/2 cups cake flour: This fine flour helps create the light texture characteristic of cake.
- 1 tbsp cocoa powder: Just a hint of cocoa adds depth to the flavor without making the cake chocolatey.
- 1/2 cup unsalted butter, softened: Provides richness and flavor; room temperature butter whips up best.
- 1 cup vegetable oil: Keeps the cake moist and tender while enhancing its fluffy texture.
- 1 cup buttermilk, room temperature: Adds moisture and a slight tanginess that complements the cake’s sweetness.
- 1 1/2 cups sugar: Sweetens the cake and helps with its structure.
- 2 large eggs: Ensure these are at room temperature to help with proper emulsification.
- 2 tbsp red food coloring: Gives the cake its signature vibrant color.
- 1 tsp vanilla extract: Enhances the overall flavor profile beautifully.
- 8 oz cream cheese, softened: The base for the delicious frosting, contributing creaminess and flavor.
- 4 cups powdered sugar: Sweetens the frosting and gives it a smooth texture.
Step-by-Step Instructions
- Preheat your oven to 350°F (175°C). Grease and flour two 9-inch round cake pans.
- In a mixing bowl, sift together the cake flour and cocoa powder. This ensures an even distribution of the cocoa and helps to incorporate air.
- In another bowl, cream together the softened butter, vegetable oil, and sugar until light and fluffy. This usually takes about 3-5 minutes.
- Add the eggs to the mixture one at a time, beating well after each addition to ensure they are fully incorporated.
- Mix in the buttermilk, red food coloring, and vanilla extract until combined.
- Gradually add the dry ingredients to the wet mixture, mixing until just combined to avoid overworking the batter.
- Divide the batter evenly between the prepared pans and smooth the tops with a spatula.
- Bake for 25-30 minutes or until a toothpick inserted into the center comes out clean.
- Allow the cakes to cool in the pans for 10 minutes before carefully transferring them to a wire rack to cool completely.
- For the frosting, beat together the softened cream cheese and powdered sugar until smooth and creamy.
- Frost the layers between the cakes and generously on the top and sides.
Recipe Details
- Prep Time: 30 minutes
- Cook Time: 30 minutes
- Total Time: 1 hour
- Servings: 12 slices
- Calories: Approximately 360 per slice
Tips, Storage & Variations
- Ensure all your ingredients are at room temperature for best results.
- Store any leftover cake in an airtight container in the refrigerator for up to 4 days.
- You can freeze the cake layers wrapped in plastic wrap and foil for up to 3 months. Thaw in the refrigerator before frosting.
- For a twist, consider adding a teaspoon of almond extract for additional flavor or replace half of the butter with additional vegetable oil for a moister cake.
FAQ

1. What makes red velvet cake different from chocolate cake?
Red velvet cake has a unique flavor profile that includes vanilla and buttermilk, along with only a small amount of cocoa powder, while chocolate cake is rich in chocolate flavor.
2. Can I use all-purpose flour instead of cake flour?
While you can use all-purpose flour, cake flour will give you a lighter, fluffier texture that is more characteristic of red velvet cake.
3. How do I make homemade buttermilk?
To make homemade buttermilk, combine 1 cup of milk (whole or 2%) with 1 tablespoon of vinegar or lemon juice, let it sit for 5-10 minutes to curdle.
4. Can I make this cake gluten-free?
Yes, you can substitute the cake flour with a gluten-free cake flour blend to make a gluten-free version of this classic recipe.
5. How do I prevent the cake from sticking to the pans?
Grease and flour your pans thoroughly, and you can also use parchment paper on the bottom of the pans for easy removal.
6. How long should I cool the cake before frosting?
Allow the cakes to cool completely on a wire rack to avoid melting the frosting.
People Also Ask
1. What is the best way to frost a cake?
Start with a crumb coat before applying the final layer of frosting for a smooth finish.
2. How can I enhance the flavor of red velvet cake?
Consider adding a pinch of cinnamon or nutmeg along with your dry ingredients for a warm note.
3. What desserts can I serve with red velvet cake?
Pair it with vanilla ice cream or a scoop of whipped cream for a delicious contrast.
4. Can I make mini red velvet cakes?
Yes, you can use cupcake liners or mini cake pans to create delightful individual servings.
5. Is red velvet cake suitable for a wedding?
Yes, its stunning color and flavor make it a beautiful choice for weddings and special occasions.
6. When did red velvet cake become popular?
Red velvet cake gained popularity in the 1920s, particularly after a recipe was featured in a well-known cookbook in the 1940s.
Conclusion
This classic red velvet cake recipe will surely bring joy to your gatherings and celebrations. Its vibrant color and rich flavor create a heartfelt dessert experience. We encourage you to try this recipe, share it with friends and family, and embrace the joy of baking. Happy baking, and enjoy every delightful slice!
PrintClassic Red Velvet Cake

A timeless dessert combining soft texture with luscious cream cheese frosting, perfect for any celebration.
- Prep Time: 30 minutes
- Cook Time: 30 minutes
- Total Time: 60 minutes
- Yield: 12 slices 1x
- Category: Dessert
- Method: Baking
- Cuisine: American
- Diet: Vegetarian
Ingredients
- 2 1/2 cups cake flour
- 1 tbsp cocoa powder
- 1/2 cup unsalted butter, softened
- 1 cup vegetable oil
- 1 cup buttermilk, room temperature
- 1 1/2 cups sugar
- 2 large eggs, at room temperature
- 2 tbsp red food coloring
- 1 tsp vanilla extract
- 8 oz cream cheese, softened
- 4 cups powdered sugar
Instructions
- Preheat your oven to 350°F (175°C). Grease and flour two 9-inch round cake pans.
- Sift together the cake flour and cocoa powder in a mixing bowl.
- Cream together the softened butter, vegetable oil, and sugar until light and fluffy, about 3-5 minutes.
- Add the eggs one at a time, beating well after each addition.
- Mix in the buttermilk, red food coloring, and vanilla extract until combined.
- Gradually add the dry ingredients to the wet mixture, mixing until just combined.
- Divide the batter evenly between the prepared pans and smooth the tops with a spatula.
- Bake for 25-30 minutes or until a toothpick inserted into the center comes out clean.
- Allow the cakes to cool in the pans for 10 minutes before transferring them to a wire rack to cool completely.
- Beat together the softened cream cheese and powdered sugar until smooth for the frosting.
- Frost the layers between the cakes and generously on the top and sides.
Notes
Ensure all ingredients are at room temperature for best results. Store leftovers in an airtight container in the fridge for up to 4 days.
Nutrition
- Serving Size: 1 slice
- Calories: 360
- Sugar: 54g
- Sodium: 300mg
- Fat: 17g
- Saturated Fat: 8g
- Unsaturated Fat: 6g
- Trans Fat: 0g
- Carbohydrates: 54g
- Fiber: 1g
- Protein: 4g
- Cholesterol: 40mg
Keywords: red velvet cake, dessert, cake recipe, baking, cream cheese frosting